Monday, June 24, 2013

design crush: apron-front sinks

One of my current design crushes is the farmhouse style apron-front sink that I see popping up in so many kitchens. I love the clean, classic look of these sinks, but even more I adore the functionality. They're big and deep, making it easy to wash everything - even that roasting pan from the Thanksgiving turkey. They're sturdy and the exposed front edge allows you to access the sink without reaching over additional inches of countertop. I also can't help but think that they'd make the perfect bathtub for baby!

With so many styles to choose from, the apron-front sink is no longer reserved for just the farmhouse style kitchen. They're made in a variety of materials and you can even incorporate them into your countertop for a seamless look that's far from country. Check out some of these great apron-front sinks and see why they're my current design crush!


I love the crisp white sink against the teal cabinets. It makes this kitchen feel clean and inviting.
:: source ::
Here is another great use of the classic apron-front sink. This kitchen happens to be the creative work of a friend and fabulous Denver based interior designer, Ashleigh Weatherill. Check out her work through the link below!
:: source ::
This white apron-front sink adds dimension to this clean, contemporary kitchen.
:: source ::
This stainless steel apron-front sink keeps the elegance going throughout this glamorous and contemporary kitchen.
:: source ::
This copper sink has a rounded front to give even more space for washing those large and cumbersome items.
:: source ::
This soapstone apron-front sink is incorporated right into the countertop for a seamless, sleek look.
:: source ::
The front of an apron-front sink offers endless possibilities to customize with decorative details.
:: source ::
You can even find apron-front sinks made out of concrete. Here, this concrete sink adds rustic charm and the functionality of dual sinks in this small bathroom.
:: source ::
Someday I will have a large apron-front sink in my kitchen, but for now I will continue to daydream!
post signature

Saturday, June 22, 2013

DIY: Dresser Renovation

I think I can officially say we're in nesting mode over here. I've been pouring myself in DIY projects to get ready for baby. The most recent completed project was renovating a dresser I picked up at Habitat for Humanity ReStore. I found it over Memorial weekend and they were offering 20% off so I got it for only $50. I had done quite a bit of research on how to refinish or paint an old dresser and followed some advice from one of my favorite bloggers, Sarah M. Dorsey. Check out her blog here, she's a talented interior designer with TONS of great DIY projects. I modified her process slightly, but did take her tips on the paint. I went to Sherwin Williams to pick up paint and they were so helpful. In fact we came back this weekend to get some advice and supplies to refinish our fence. I would highly recommend going there for a paint project instead of the big box stores because they specialize in paint and know what will work best for any kind of project.
Renovating this dresser only took a few hours to sand and paint over the course of a weekend with drying time. I took recommendations from Sherwin Williams and made sure to buy the best supplies for this project. The dresser is a small surface, but will get a lot of use so it was important to me to invest in quality paint and supplies.

Supplies:
Step 1: Remove hardware and drawers from dresser. Fill in any gashes or cracks with wood filler if necessary. Using the course sand paper, sand down the existing paint or varnish to get an even surface on the dresser and drawers. Afterwards, go over the entire surface again with fine sand paper for a smooth finish.


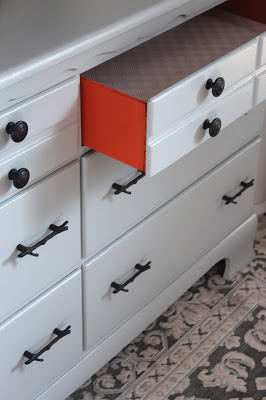
Step 2: To add a pop of color, spray the sides of the drawers (both inside and out) with spray paint. I did not prime the drawers before doing this, and I wish I had. The wood soaked up the paint and I ended up using 4 cans for 6 drawers.

Step 3: When spray paint is dry, go over dresser and drawer fronts with primer. Use the brush to get into the edges, and the roller to provide a smooth, even finish. Go over with a second coat if necessary.

Step 4: Once the primer is dry, paint the dresser and drawer fronts using the same technique as the primer. Use two thin coats instead of one heavy coat to avoid drips.

Step 5: Add contact paper if desired to line the drawers and give a nice smooth, polished finish. Carefully measure the inside drawer dimensions and use the exacto knife to cut the paper to size. This is also an opportunity to add a fun pattern if you'd like. I added a diamond textured liner instead of a colored pattern and I think it's just as fun. Screw in the hardware and you're done!


Here is the finished dresser and a sneak peek at how the nursery is coming along!
Here's a look at how cute the drawers look with baby's things inside!
This dresser renovation has given me the confidence to restore the dressers in our bedroom. They're family pieces so I wanted to test out this process on something less sentimental first.

post signature

Wednesday, June 19, 2013

6 easy summer updates to brighten your home

Summer officially starts on Friday so I've pulled together a list of my favorite easy ways to update your home to welcome the season.

1. Fresh Flowers & Farmers Market Finds
When you're looking to add some summer color to your home, look no further than your local Farmers Market. Fresh flowers are the perfect way to bring a fresh pop of color to any room, all year round. A bowl of cherries or apples look gorgeous on the kitchen counter and as a bonus they're handy for easy snacking! Vegetables, like artichokes or tomatoes, and even baked goods look great on display as well. 
:: source ::
:: source ::
2. Colorful Linens and Pillows
You can bring the colors of summer into any room by swapping out some of your linens. Bring in bright summery yellows, pinks and oranges into your kitchen with new hand towels. Or add some colorful throw pillows to the sofa in your living room. Even the bathroom can get an update with some colorful towels.
:: source ::
:: source ::
3. Potted Herbs
There's nothing better than cooking with fresh herbs so why not display them? They add color and fragrance to your kitchen and make it easy to incorporate them into your cooking.
:: source ::
:: source ::
4. Outdoor Rug
Make your outdoor space more welcoming with an outdoor rug. Even a simple rug can make you want to take off your shoes, relax and spend some more time outdoors. 
:: source ::
:: source ::
5. Set up a Bar Area
Summer is the perfect time for parties on the patio and impromptu get togethers with your neighbors. A tray on a table in the corner of a room or the far end of the counter is all you need to add a festive mood and encourage those unexpected guests to enjoy the daylight a little longer.
:: source ::
:: source ::
6. Curate Vacation Treasures & Photos
Nothing says summer like vacation. Display your favorite vacation memories for a fun seasonal update. Swap out photos in existing frames for some images from that special vacation. And why not display your collected treasures like seashells or postcards? Hang postcards on a string or place seashells in bowl or vase to highlight vacation memories and even stimulate conversation.
:: source ::
:: source ::
:: source ::
I hope you enjoyed these tips. I know I'm looking forward to bringing a little summer into my home!

post signature

Thursday, June 13, 2013

DIY: Beadboard Paneling

This weekend the hubby and I finally made some major progress on the nursery. First we sanded down the trim areas where the paint was chipping, washed, and then painted the walls. Then the challenging part - installing the beadboard paneling I had my heart set on.
Final Beadboard Paneling
Here's a reminder at how the original guest room looked.
A few notes before we share how we did this project:

  1. We originally were going to use the giant sheets of beadboard paneling (4' wide x 8' tall), but at the last minute I found some smaller panels at Home Depot (7" wide x 32" tall). The smaller panels were a little more expensive, but we don't have a lot of tools or a good work space, so the large sheets would have been unwieldy for us. Once we realized how uneven our 100-year-old house is, we knew we made the right decision with the smaller panels. 
  2. We wanted to keep our existing baseboards, but did NOT want to remove them from the wall to fit the paneling behind them. So we improvised and got a small quarter-round trim to cover the seam where the baseboard and paneling meet. This worked perfect for us, but if you don't have 100-year-old baseboards, it would be just as easy to add new baseboards with a notch at the top for the paneling to fit behind seamlessly.
  3. We had difficulty finding chair rail molding. You want the molding to have a little notch at the bottom so it fits over the top of the paneling and hides the seam. Most improvement stores only carried baseboards and crown molding, which could have worked if we had a router to create a notch, but we don't. Luckily we found a Home Depot out in the suburbs that had one option for a notched chair rail - made specifically for covering paneling. 
  4. In general, we have very limited tools but a lot of creativity. This project would have been faster if we had great tools and a workshop, but this just goes to show that where there's a will there's a way!

Supplies:

  • Measuring Tape
  • Pencil
  • Beadboard panels (after measuring your space, remember to get a few extras for mistakes)
  • Chair Rail with Notch 
  • Quarter Round Trim 
  • Level
  • Circular Saw
  • Mitre Box & Saw
  • Nail Gun
  • Finishing Nails
  • Painter's Caulk
  • Caulk Gun
  • Caulk Edging Tool
  • Spackle
  • Painters Tape
  • Paint (we took the time to match our existing molding so we didn't have to repaint all the window casings and door frames)

Step 1: Determine how high you want the paneling to go. The "standard" height of beadboard paneling when used as wainscoting varies. Some say the finished height should be 1/3 the height of the ceiling and others say anywhere from 32" to 46". We wanted the paneling to end underneath the window casing and the trim to be in-line with the casing. That gave us a finished height (including baseboard and chair rail) of 40" (+/- 1" due to the inconsistencies of our house).

Step 2: Measure the panels to the correct height (finished height minus the chair rail height and baseboard height) and mark with a pencil line on the back. With our home being so old, we had a difference of up to 2 inches in the height of the panels to maintain a level top edge around the room. So we measured each panel before installing it. If your home is newer, chances are you have an even height around the room - in which case you can measure and cut all your boards at once and save time.

Step 3: Using a circular saw, cut each panel at the pencil line. We found that cutting on the backside was a little easier. 


Step 4: Start at a corner and begin nailing the panels to the wall. We have old plaster walls, so we used a nail gun with an air compressor to avoid cracking the plaster with a hammer. Our panels had tongue-and-groove edges to lock them together. We moved left to right around the room and used two nails for each board - one at the top left of the board and one at the bottom left. That meant the right edge of the board was loose and allowed us to easily fit the next board in place.

Step 5: Measure the chair rail molding to the correct length and mark with a pencil line. To cut the length of the molding for the corners, use a mitre saw or mitre box to cut the edge at a 45 degree angle. Fit the molding over the paneling and nail into place. 

Step 6: Follow the same process as the chair rail: measure, cut and nail the quarter round into place to cover the seam where the bottom edge of the paneling and baseboard meet. If not using existing baseboards, you would follow the same process as the chair rail for installing new baseboards.


Left: unfinished edge, Right: finished caulked edge
Step 7: Finishing. With our old house, some of the seams were imperfect at the existing molding, and where the chair rail met the wall. To fix that, we filled the gaps. Tape off the wall at the top edge of the chair rail. Fill any gaps with painter's caulk. While the caulk is still wet, use an edging tool to perfect the seam (similar to bathroom tile). Remove tape before caulk dries completely to ensure a clean line. Next, use a small amount of spackle to cover all the nail holes. You can either sand the spackle after it dries, or I found that using a wet paper towel to wipe off excess before it dried worked well.

Step 8: Paint. Don't forget to re-tape the top edge at the chair rail and the floor at the bottom edge. Also tape any existing molding if necessary. We used a special brush made for trim to really get in the cracks and seams of the paneling, and then used a roller to go over the paint to give even coverage and texture. 

This project took us two days, but was totally worth it. It would have been faster if we didn't have so many uneven areas of our house and if I wasn't 7 months pregnant and needing breaks. 

Now I'm ready to start furnishing the nursery and decorating!

post signature

Tuesday, June 11, 2013

flash sale: whimsical artwork

I absolutely love flash sale sites (Ideeli, Rue La La, One Kings Lane etc.) but my favorite by far is Joss & Main. They have great 2-3 day sales on everything for your home. I've found so many great items for my home at a fraction of the original cost - plus the items feel unique because you can't find them everywhere. One of today's sale collections is called 'Tropical Punch' and I just had to share some of the pieces. Aren't these plaques just adorable? I think they would look fantastic in a home office or walk-in closet. 
:: buy ::
:: buy ::
:: buy ::
If you love these too, hurry over to Joss & Main and snag one because the sale ends Thursday!

post signature

Friday, June 7, 2013

inspiration of the week: beadboard paneling

It's been a long time since my last post. I've been busy with school, travel and the nursery - and generally having less energy in the final months until baby comes. I spent a long weekend in Ohio for baby showers. Both of our families threw a shower and each one was different and adorable! So many clever ideas that I will remember for when I throw a shower. Everyone told me not to register for any cute baby clothing, toys and accessories, because you'll get them at your shower. They were right. Baby now has the CUTEST wardrobe, plus dozens and dozens of books and toys that other moms swear by. I brought my camera to take pictures of every detail, but I was exhausted and overwhelmed and completely forgot! 

So now for the nursery! After a weekend of baby showers, I officially have the baby bug and am diving straight into the nursery. We painted the walls and plan to tackle the beadboard paneling detail this weekend. This feels like a big job for us, so I've been pulling together lots of inspiration and doing research on how to install the paneling ourselves. Since our home is one hundred years old, we want to make sure not to damage the walls or existing trim. I'll post the details of our project when it's complete, but for now, check out these rooms with beadboard detail that inspired me.

This library uses beadboard paneling in its traditional sense, giving the room a Cape-Cod-inspired, coastal feel.
:: source ::
I love using beadboard paneling in a kitchen. Here the turquoise color adds a great pop of color behind the open shelving.
:: source ::
Another classic use of beadboard paneling is in the bathroom as wainscoting. I love the texture the paneling adds to this simple and serene space.
:: source ::
This very white neutral nursery works because of the textural elements of the lighting, area rug, poms and of course, the beadboard wainscoting.
:: source ::
Beadboard can also be used in more formal spaces, like this living room. Here it has been installed on the ceiling and as a wainscot treatment.
:: source ::
I love this neutral nursery and the beadboard paneling makes it feel crisp and welcoming.
:: source ::
This attic space gets some dimension and light from the beadboard paneling. It also adds a nautical vibe.
:: source ::
Here, the white beadboard paneling in this small nursery actually helps make it feel larger.
:: source ::
Stay tuned, next week I'll post the details of our DIY beadboard wainscoting in the nursery.

post signature
Related Posts Plugin for WordPress, Blogger...