
I think I can officially say we're in nesting mode over here. I've been pouring myself in DIY projects to get ready for baby. The most recent completed project was renovating a dresser I picked up at Habitat for Humanity ReStore. I found it over Memorial weekend and they were offering 20% off so I got it for only $50. I had done quite a bit of research on how to refinish or paint an old dresser and followed some advice from one of my favorite bloggers, Sarah M. Dorsey. Check out her blog here, she's a talented interior designer with TONS of great DIY projects. I modified her process slightly, but did take her tips on the paint. I went to Sherwin Williams to pick up paint and they were so helpful. In fact we came back this weekend to get some advice and supplies to refinish our fence. I would highly recommend going there for a paint project instead of the big box stores because they specialize in paint and know what will work best for any kind of project.
 Renovating this dresser only took a few hours to sand and paint over the course of a weekend with drying time. I took recommendations from Sherwin Williams and made sure to buy the best supplies for this project. The dresser is a small surface, but will get a lot of use so it was important to me to invest in quality paint and supplies.
Supplies:
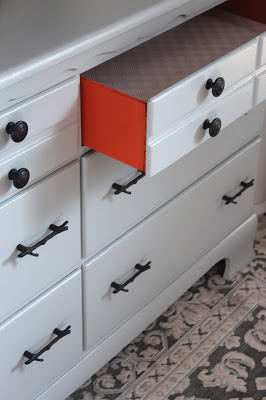 Step 2: To add a pop of color, spray the sides of the drawers (both inside and out) with spray paint. I did not prime the drawers before doing this, and I wish I had. The wood soaked up the paint and I ended up using 4 cans for 6 drawers.
Step 3: When spray paint is dry, go over dresser and drawer fronts with primer. Use the brush to get into the edges, and the roller to provide a smooth, even finish. Go over with a second coat if necessary.
Step 4: Once the primer is dry, paint the dresser and drawer fronts using the same technique as the primer. Use two thin coats instead of one heavy coat to avoid drips.
Step 5: Add contact paper if desired to line the drawers and give a nice smooth, polished finish. Carefully measure the inside drawer dimensions and use the exacto knife to cut the paper to size. This is also an opportunity to add a fun pattern if you'd like. I added a diamond textured liner instead of a colored pattern and I think it's just as fun. Screw in the hardware and you're done!
This dresser renovation has given me the confidence to restore the dressers in our bedroom. They're family pieces so I wanted to test out this process on something less sentimental first.


Supplies:
- Electric Sander (you can use a hand sander but it will take longer)
- Course sand paper
- Fine sand paper
- Spray Paint
- Sherwin Williams Premium Wall & Wood Primer
- Sherwin Williams ProClassic Interior Acrylic Latex Enamel
- Purdy White Dove Roller
- Purdy Clearcut Glide 2.5" Brush
- Contact Paper
- Exacto Knife
- Measuring Tape
- 8 Drawer Pulls
- 8 Drawer Knobs

Step 3: When spray paint is dry, go over dresser and drawer fronts with primer. Use the brush to get into the edges, and the roller to provide a smooth, even finish. Go over with a second coat if necessary.
Step 4: Once the primer is dry, paint the dresser and drawer fronts using the same technique as the primer. Use two thin coats instead of one heavy coat to avoid drips.
Step 5: Add contact paper if desired to line the drawers and give a nice smooth, polished finish. Carefully measure the inside drawer dimensions and use the exacto knife to cut the paper to size. This is also an opportunity to add a fun pattern if you'd like. I added a diamond textured liner instead of a colored pattern and I think it's just as fun. Screw in the hardware and you're done!
 |
| Here is the finished dresser and a sneak peek at how the nursery is coming along! |
 |
| Here's a look at how cute the drawers look with baby's things inside! |

No comments:
Post a Comment